


Guías
Adding Custom Tokens to Your Trust Wallet
Compartir publicación
En resumen
Learn how to add custom tokens to Trust Wallet safely using contract address verification. Step-by-step guide with security tips included.
Key Takeaways:
Most major tokens appear automatically in Trust Wallet, but newer or lesser-known tokens need manual addition.
Custom tokens require contract address verification for safe addition to your wallet.
Always verify token information through official sources before adding custom tokens to your wallet.
Trust Wallet makes managing your crypto simple and secure. While popular tokens appear automatically in your wallet, you might encounter newer projects or lesser-known tokens that don't show up right away. Learn how to add a custom token using Trust Wallet and ensure that all your digital assets are easily accessible and well-managed.
Why Some Tokens Don't Show Automatically
Trust Wallet displays thousands of popular tokens automatically to make your experience smooth. The wallet includes tokens from major blockchain networks like Ethereum, BNB Smart Chain, and Polygon in its default token list. When you receive these tokens, they appear in your wallet without any extra steps.
Newer tokens or projects with smaller market caps might not appear in the automatic token list yet. Trust Wallet regularly updates its supported tokens, but the crypto space moves fast. Projects launch new tokens daily, and it takes time for wallets to add every single one to their databases.
Some tokens also exist on newer blockchain networks that have fewer listed tokens overall. When you interact with emerging DeFi protocols or participate in new project launches, you'll often need to add these tokens manually to see your balances.
Finding the Right Contract Address
The contract address acts like a unique identifier for each token on the blockchain. Finding the correct contract address is the most important step when adding custom tokens to your Trust Wallet. Using the wrong address could connect you to scam tokens or fake projects designed to steal your funds.
Start your search on the project's official website. Legitimate projects display their contract address prominently on their main pages or in dedicated sections. Look for pages labeled "Token Information," "Contract Details," or similar headings. Copy the contract address directly from these official sources rather than relying on third-party websites.
Social media channels managed by the project team also provide reliable contract addresses. Check the project's verified X account, official Telegram channel, or Discord server for pinned messages containing contract information. These platforms often feature the contract address in their bio sections or pinned announcements.
Step-by-Step Guide to Adding Custom Tokens
Adding a custom token to Trust Wallet is a simple process. Follow these steps to ensure that your new token is properly integrated into your wallet:
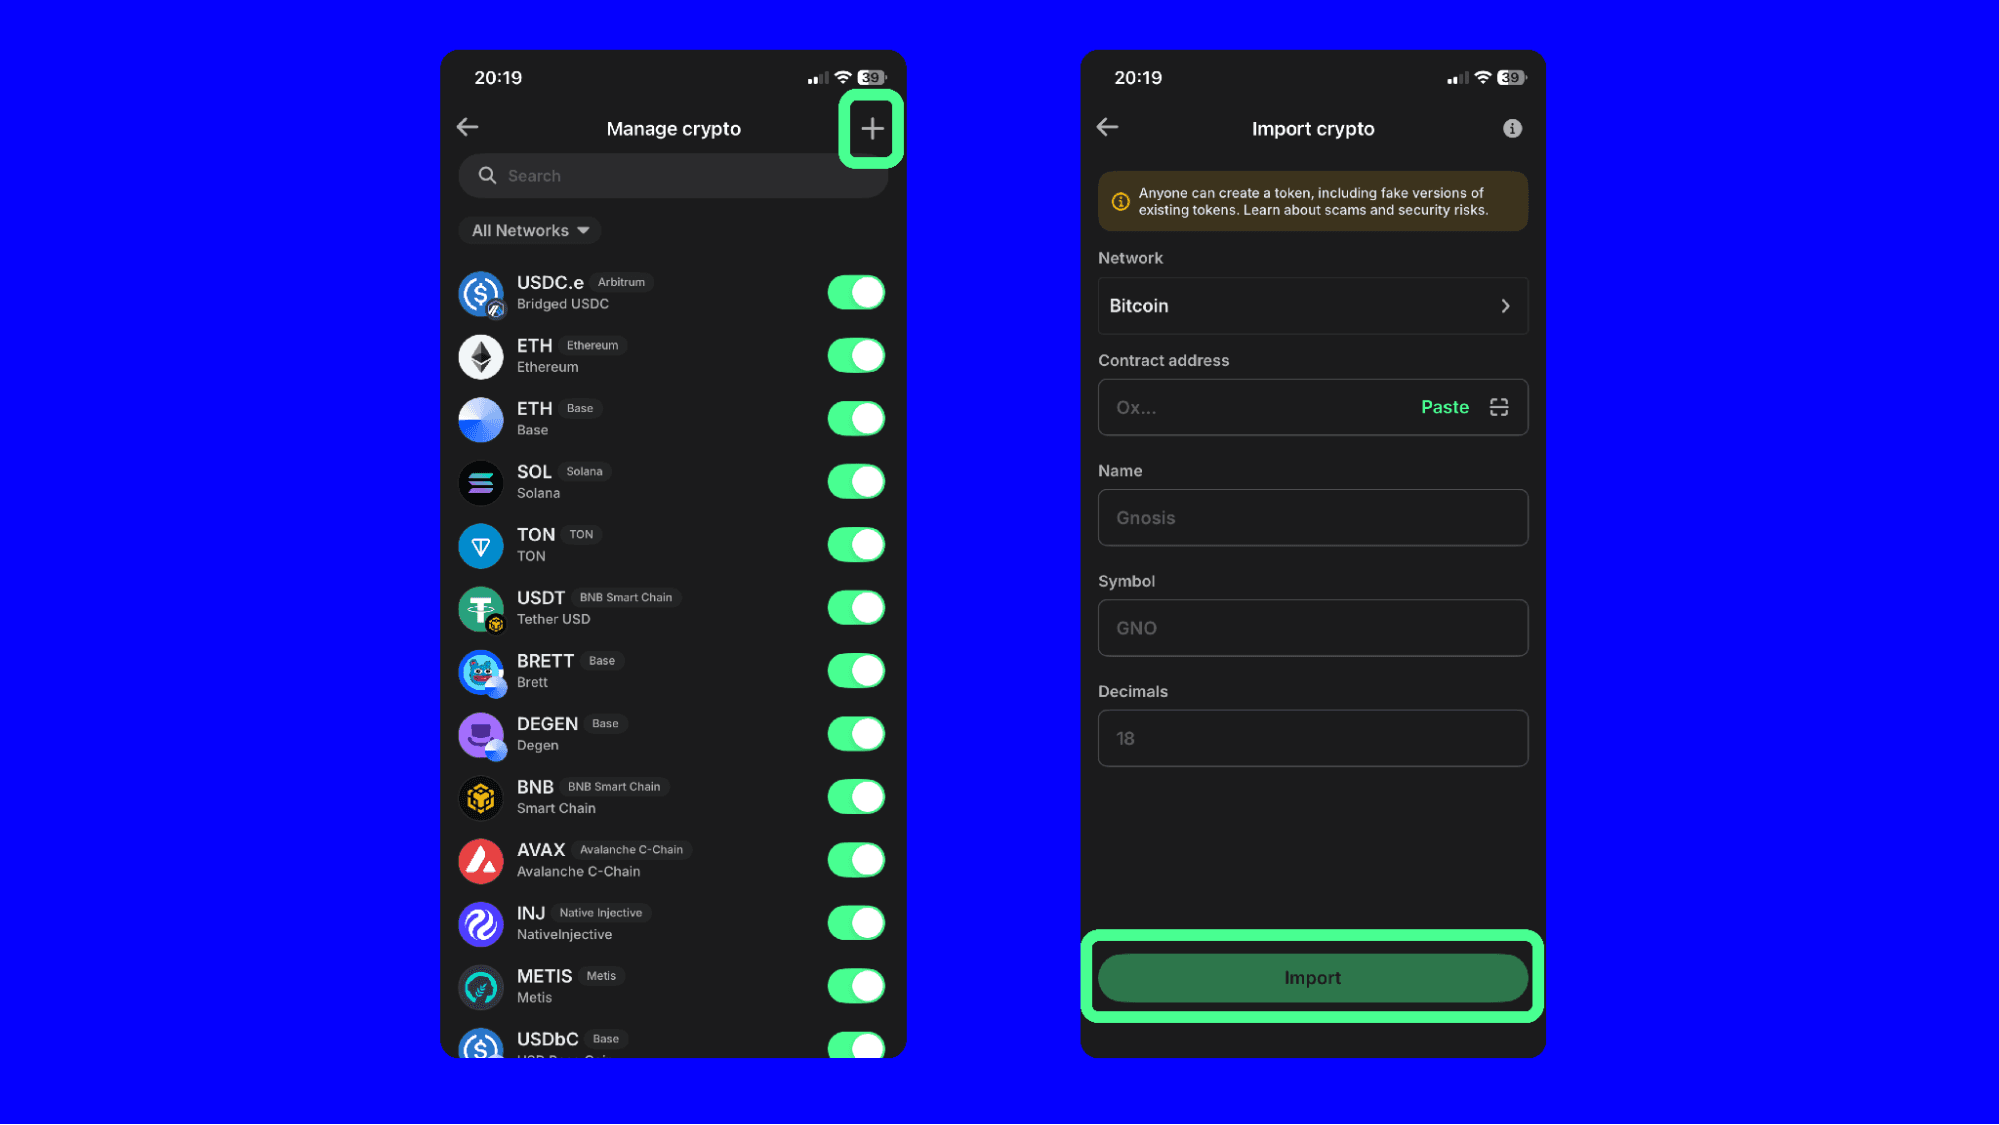
1. Open The Trust Wallet App
Launch the Trust Wallet app on your mobile device.
On the main screen, click the asset layout button.
Click the “manage crypto” button option to start the process of adding a new token.
Next, click the “+” button option to start the process of adding a new token.
2. Adding Custom Token
Choose the correct blockchain network from the dropdown menu (e.g. Ethereum, Binance Smart Chain). Make sure you select the network that matches the token’s blockchain.
3. Enter Token Details
Contract Address: Input the token’s contract address. This is a unique identifier for the token on the blockchain. You can find this information on the token’s official website or block explorer.
Token Name: Enter the full name of the token.
Token Symbol: Enter the token’s symbol (e.g. ETH for Ethereum).
Decimals: Input the number of decimals the token uses. This is typically found along with the contract address.
4. Import Token
Review the details you’ve entered to ensure they are correct.
Tap “Import” to complete the process.


Double-Checking Your Token Addition
After adding a custom token, verify that the token details match official project information. Check that the token name, symbol, and logo display correctly in your wallet. Incorrect information might indicate you've added a fake or copycat token instead of the legitimate project.
Test the token functionality with a small amount first if you plan to purchase or receive the token. Send a minimal test transaction to ensure the token works properly and appears correctly in your transaction history. This approach helps identify any issues before committing larger amounts.
Monitor your wallet for any unexpected behavior after adding custom tokens. Legitimate tokens shouldn't cause crashes, display errors, or interfere with other wallet functions. If you notice problems after adding a token, remove it immediately and research the project more thoroughly.
Closing Thoughts
Adding custom tokens to Trust Wallet expands your access to the growing crypto ecosystem. Remember to take time to verify every custom token through official sources. Starting with small amounts and double-checking token details helps ensure safe interactions with new projects.
Download Trust Wallet Disclaimer: Content is for informational purposes and not investment advice. Web3 and crypto come with risk. Please do your own research with respect to interacting with any Web3 applications or crypto assets. View our terms of service. Join the Trust Wallet community on Telegram. Follow us on X (formerly Twitter), Instagram, Facebook, Reddit, Warpcast, and Tiktok
Note: Any cited numbers, figures, or illustrations are reported at the time of writing, and are subject to change.